Tis the season, guys, so I am all about christmas treats until the end of December.
Today I am sharing a very easy way to create cute christmas cake pops without having to be an advanced cake pop designer at all!
Candy Canes – everybody loves them and they cannot be missed during the holidays!
I absolutely love candy canes, they look so cute and taste really great too. I personally do not like the peppermint version too much, but they all look wonderful.
I am planning a candy bar with my friend Sandra for christmas that we will set up next Sunday and these cake pops will definitely be in there.
Please read on to see more photos and to get the recipe.
- Prep Time 20 minutes
- Baking Time 20 minutes in refrigerator
- Difficulty Easy
For the Candy Cane Cake Pops:
- 1 package OREO cookies or for Europeans: 3 and a half packages a 176g
- 1 8oz. package cream cheese (I use 176g packages (6.2 ounces)
- Wilton White Candy Melts
- Lollipop Sticks
- Crushed Candy Canes
- red/white striped paper straws (for an even cuter look, I have not used them for these ones though)
Additional Items you may want to get, makes a nice gift:
- Lollipop plastic covers, to give away
- ribbon for tying, to give away
- thin red ribbon to tie around basic white lollipop stick (this way you do not need red/white paper straws)
- Prepare yourself before you actually start. Get everything out on the counter you need, so you do not stress yourself in the middle of the decorating process :-)
- 1. Now, make the NO BAKE Cake Pops: Grind your OREO cookies to fine crumbs in a Food Processor
- 2. Put the crumbmix into a boal and hand mix with cream cheese. I use gloves though, because it gets messy :-) Especially when you have longer nails, it takes a while to be “oreo/creamcheese-free” again. So just use gloves, or when you have kids, I am sure they would love to help you with this step :-)
- 3. Keep in mind that the dough should have the consistency of play-dough.
- 4. Roll the dough into balls, then refrigerate them for at least 10 minutes to firm up.
- 5. Now melt your Candy Melts.
- 6. Dip a little bit of the Lollipop Stick in the melted candy, then stick the Lollipop Stick in the Cake Pop (half way) and dip the Cake Pop in the melted candy wafers.
- 7. Now you can add your crushed Candy Canes, sprinkle on top or roll the cake pop in the bowl with the crushed candy canes, that is all up to you.
- 8. Put the cake pops in a styrofoam block to dry completely.
- 9. If you want to add a little more cuteness to your cake pops, and if you’re using regular lollipop sticks, why don’t you tie a thin red ribbon around them: Wrap your red ribbon (thin) diagonally to get the candy cane look. Dot a little bit of hot glue (be careful!) on both ends of the ribbon to secure it. That makes your cake pops even cuter!
- And you’re done, yay =)
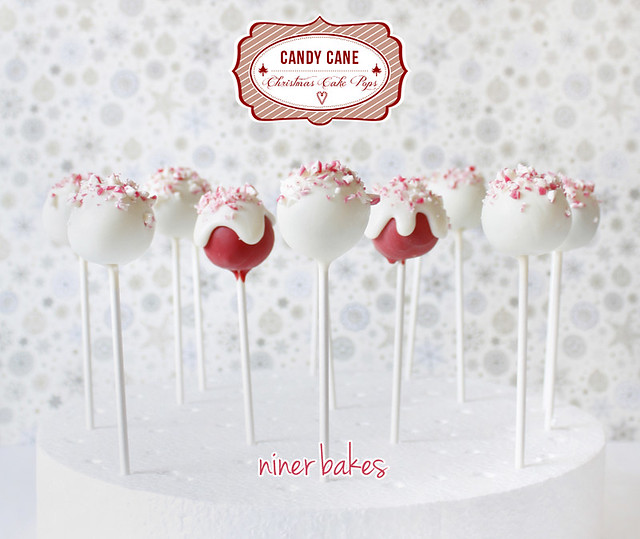
This is the outcome. I love the simplicity to it!
For some of them I used red candy melts, let it all dry and then (with a spoon) poured a little drip onto the red cake pop, so it looks a little like snow. I think those are cute too.
Imagine those in a christmas candy bar or sweet table, they would look so lovely between christmas cupcakes, marshmallows, peppermint pillows, candy canes etc.
I wish you all a great day!
Blessings…niner
 niner bakes










Absolutely gorgeous Niner!! I love the colors, the composition, and the photos are stunning! Thanks for the eye-candy this morning! xo
Instead of the Candy Melts, could I use white chocolate?
Hi Bonnie, sure, you can buy white chocolate at the store and try that out. Make sure you buy chocolate you can use for baking. Good Luck and blessings,
niner
Hi,
I was just wondering how you got the white candy melts to cover the red cake pop without it dripping down, did u dip it again? Did you change the consistancy?
Thanks
Hi Karley,
after the red melts have dried,
I drip the white melts on top of it, and they are not super runny, this is important.
Have a look on the video on how to do it.
Blessings,
niner